
This easy homemade focaccia bread recipe makes soft, fluffy, golden focaccia with no fancy tools and zero stress. Perfect for beginners!
Jump to:
✨This homemade focaccia bread recipe was inspired by Marcella Hazan’s recipe in Essentials of Classic Italian Cooking, and by Samin Nosrat’s Salt, Fat, Acid, Heat. Two of my all-time favorite cookbooks!
This easy focaccia bread recipe is great for family dinners, sandwiches & soups. It's the perfect side to serve with some cheesy parmesan risotto and as a base for beef tenderloin crostini, and on our friday night charcuterie boards.
What Is Focaccia?
Focaccia is an olive oil-enriched, leavened Italian flatbread that’s spread out in a pan and dimpled all over with your fingertips before baking. Those little wells collect olive oil, giving it its signature crispy golden crust and rich, savory flavor.
The best homemade focaccia bread has a soft, airy interior and a crispy, golden crust. It’s rich with olive oil, full of flavor, and topped with just the right amount of flaky salt and herbs.
Traditionally from Liguria, focaccia is often enjoyed as a street food or shared at the table - torn by hand, dipped in oil, or layered into hearty sandwiches. We love to pile homemade focaccia bread high with pastrami and provolone! I’ve made this for my daughter every single time she’s come home for a visit!
Why You'll Love This Recipe
Making this homemade focaccia bread recipe is surprisingly relaxing. The dough is soft and stretchy, with no rush, just gentle mixing, a slow rise, and plenty of olive oil.
There’s something soothing about dimpling it with your fingertips, drizzling on olive oil, and sprinkling flaky salt before the oven takes over. It’s the kind of recipe that invites you to slow down and enjoy the process as much as the end result. This homemade focaccia bread recipe is:
- Beginner-friendly - No fancy equipment needed.
- Versatile - Great with soups, sandwiches, charcuterie boards, or as a cozy side for just about anything.
- Flavor-packed - Customize with herbs like rosemary, a sprinkle of cheese, or your favorite toppings.
Ingredients Notes & Substitutions
- Flour - Use bread flour for that perfect airy, chewy texture and crisp crust. All-purpose flour works, but bread flour is better. Bread flour gives you more chew and larger air bubbles that you expect from homemade focaccia bread because of its higher protein content.
- Yeast – I use SAF Instant Yeast or quick-rise yeast in this recipe - both work great and can be mixed directly into the flour.
Only have active dry yeast? That works too, just stir it into the warm water first to activate it before adding the rest of the ingredients.
Pro Tip: Whether you’re using active dry or instant, fresh yeast is key for a good rise. If you’re not sure whether it’s fresh, check the expiration date or proof it in warm water with sugar - if it bubbles, it’s ready to use.
✨Learn More: Which Yeast to Use? by King Arthur Bread Company. - Olive Oil - This is key! Use a good quality extra virgin olive oil - it gives focaccia its signature flavor and helps make the crust crispy. A bold, fruity, high-quality olive oil will make a huge difference in flavor.
- Flaky Salt - Flaky sea salt is best for sprinkling on top of homemade focaccia bread; it adds crunch and flavor. Kosher salt also works. Don't use table salt for finishing, if you can help it.
- Fresh Herbs - Rosemary, thyme, or oregano are great additions. I always go with fresh herbs when I can - dried ones (especially rosemary) can be a little tough and woody in focaccia.
- Toppings - Go simple or creative with cherry tomatoes, olives, caramelized onions, garlic, or shredded cheese like Parmesan.
See the recipe card for full information on ingredients and quantities.

Focaccia Topping Ideas & Flavor Variations
- Rosemary & Sea Salt - The classic. Fragrant rosemary and flaky salt bring out the best in the olive oil-rich dough.
- Cherry Tomato & Olive - Juicy roasted tomatoes and briny Italian olives add a burst of sweet and savory flavor.
- Caramelized Onions - Slow-cooked onions add deep sweetness and a hint of umami.
- Roasted Garlic - Soft, golden garlic cloves melt into the dough, giving each bite a mellow, savory richness.
- Garlic Oil - We always keep this on hand for dipping bread, making pizzas, sauteeing vegetables, and for salad dressing.
- Caramelized Onion & Burrata with Hot Honey - This one hits all the right notes - sweet, creamy, and a little spicy. After baking with caramelized onions, tear burrata over the warm bread and drizzle with hot honey. Rich, melty, and perfect with prosciutto or arugula.
How to Make Focaccia Bread (Step-by-Step)
Don’t worry - this homemade focaccia bread recipe uses a no-mixer method and is simple, relaxing, and totally doable, even if you’ve never baked bread before. You’ll mix the dough, let it rise, dimple it with olive oil, let it rise again, and bake it to golden perfection.
Prefer a stand mixer? You can absolutely use one, but it’s not required. Let’s walk through it together, one easy step at a time.
Make the Dough
Step 1. Proof the Yeast (If Needed).
Using active dry yeast? In a large bowl or stand mixer, combine the warm water (95–105°F), yeast, and sugar. After 5 to 10 minutes, the top should look foamy. That means the yeast is active and ready to go.
Using instant or quick-rise yeast? Skip this step - you’ll add it straight to the flour in the next one.
Step 2. Mix the Dough (By Hand).
If using instant yeast: In a large bowl, whisk together the flour, salt, and instant yeast.
If using active dry yeast: Stir the proofed yeast mixture into the remaining water, then pour it into the bowl with the flour and salt.
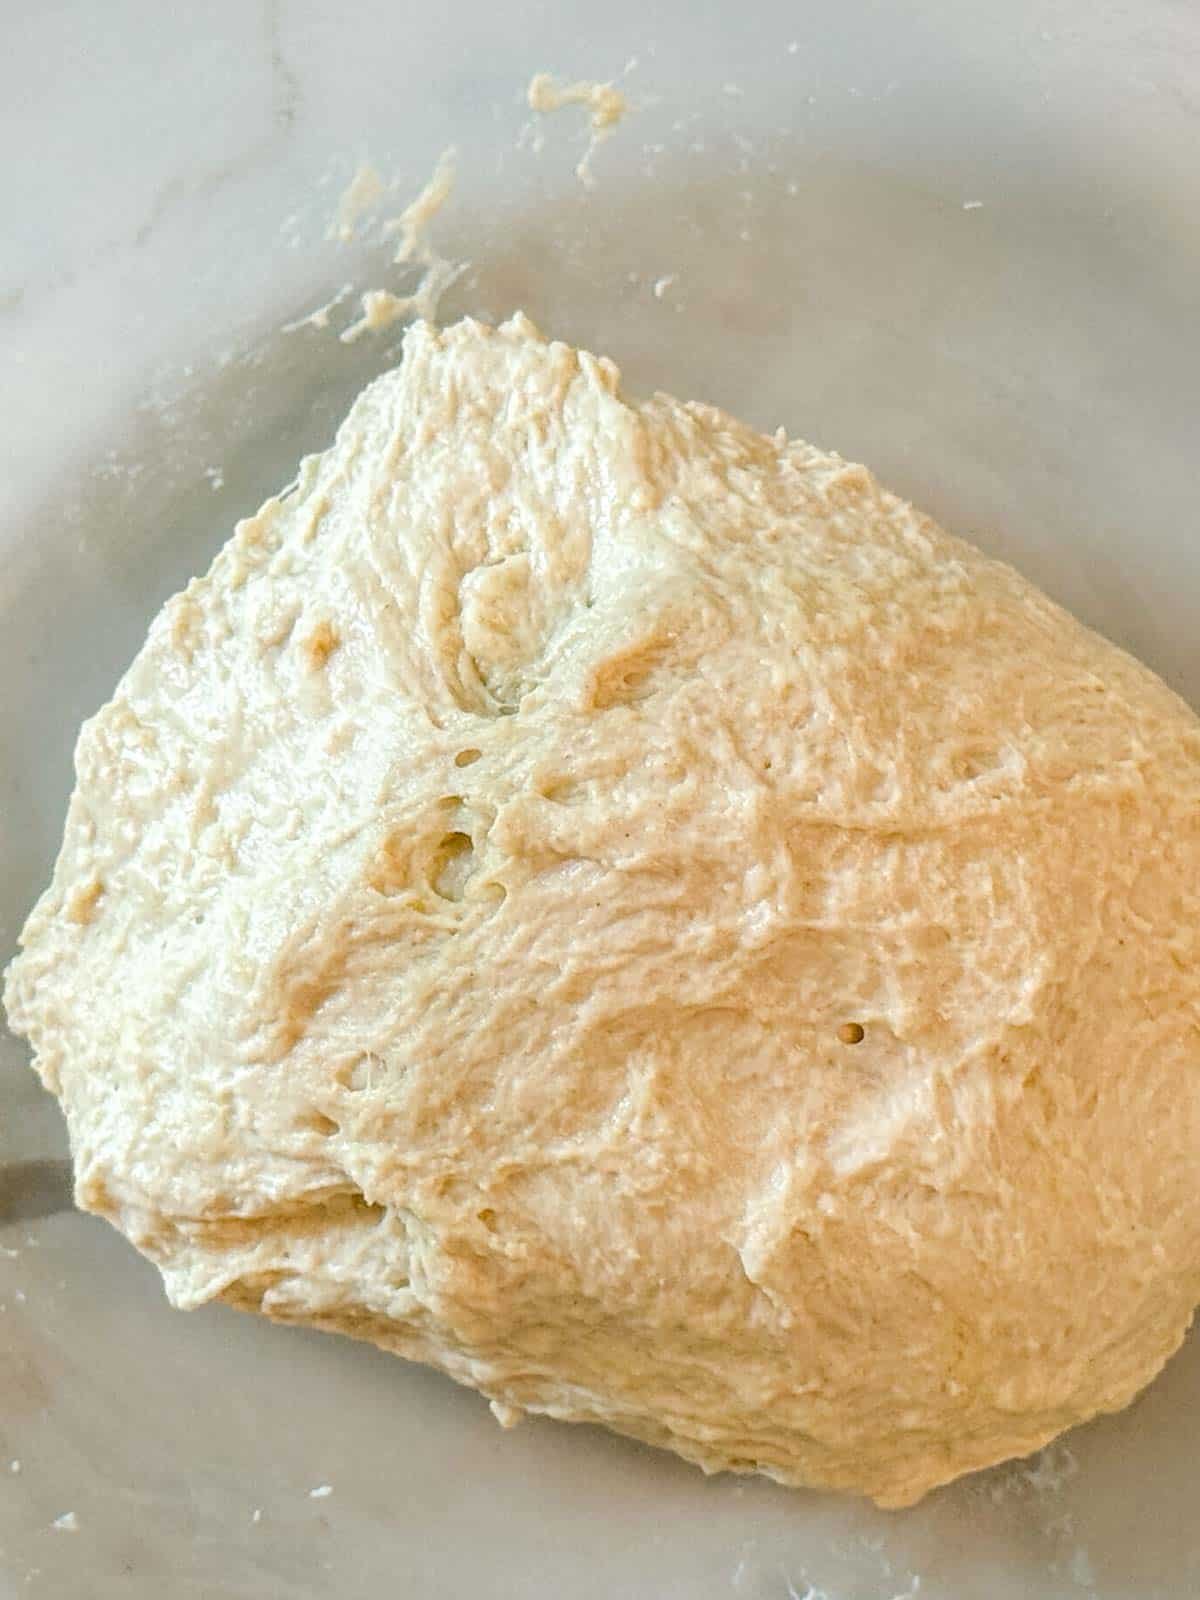
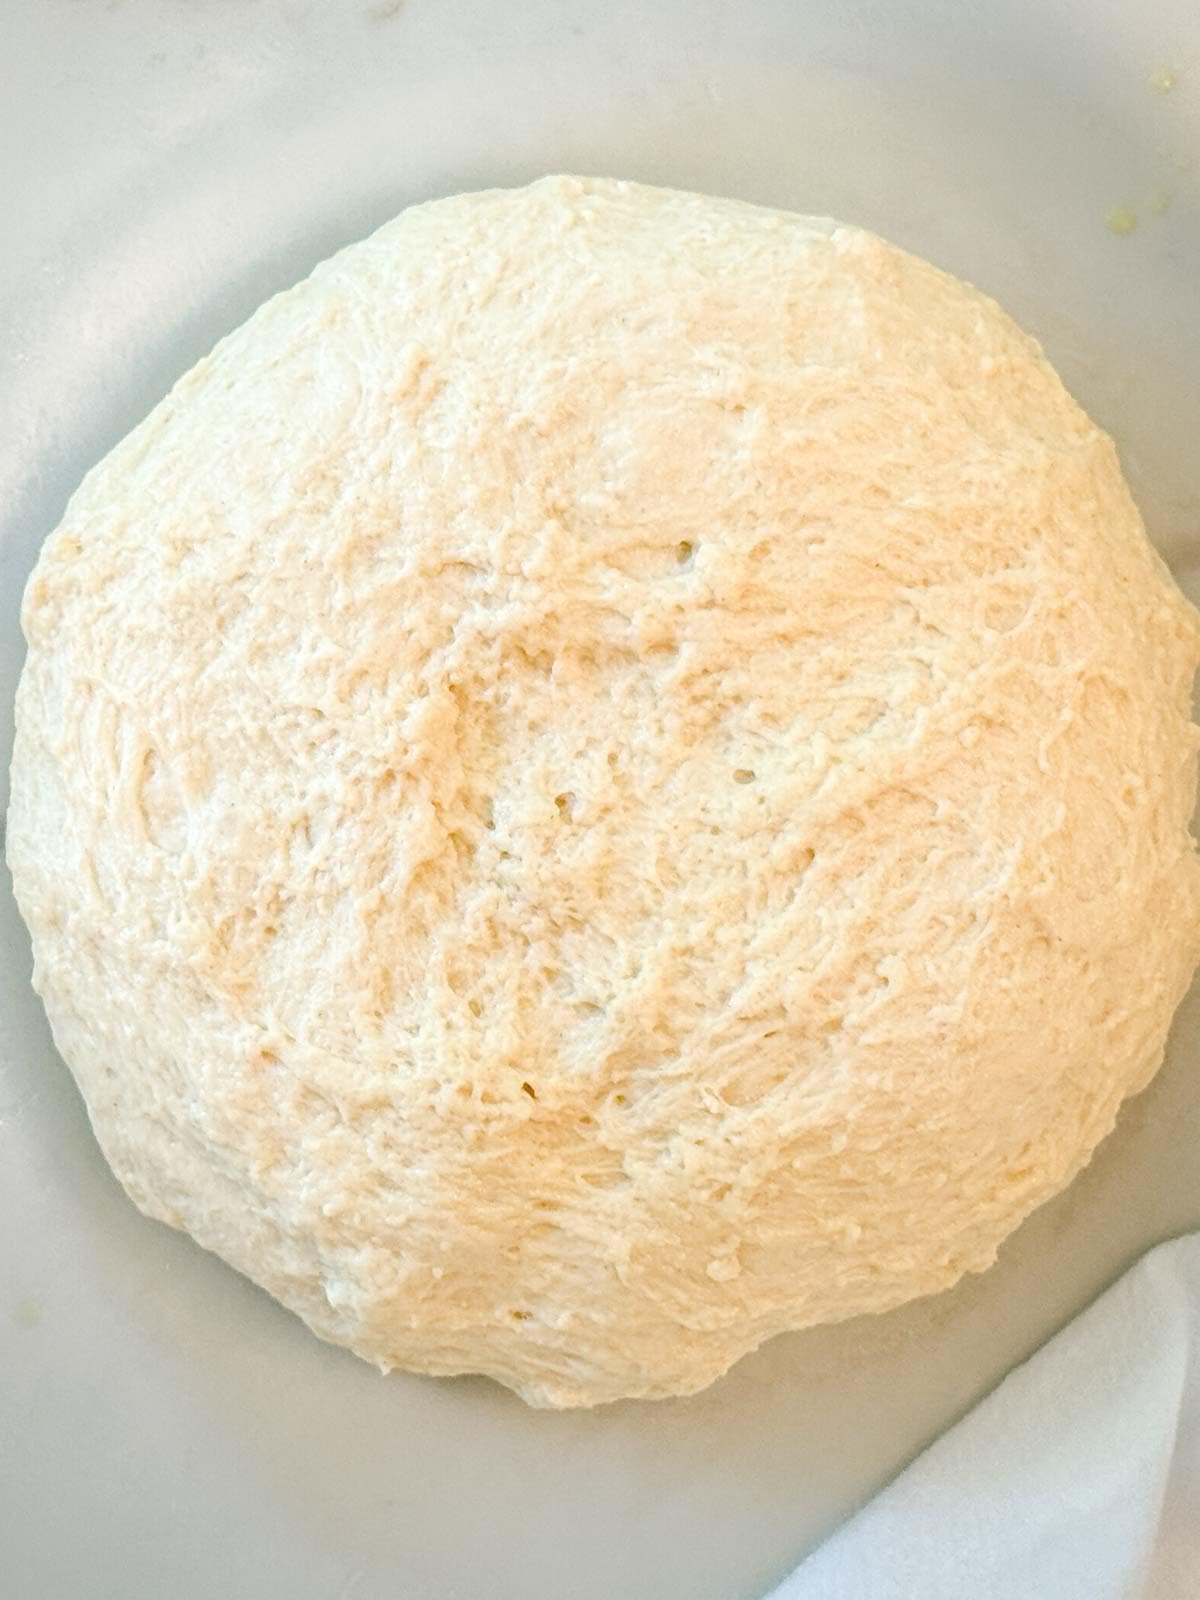
Mix everything together until a sticky dough forms. It won’t look smooth, and that’s ok. Just make sure all the flour is fully incorporated and there are no dry spots.
✨ The dough should be soft and a little tacky. If it feels dry or stiff, work in 1 to 2 tablespoons of water to loosen it up.
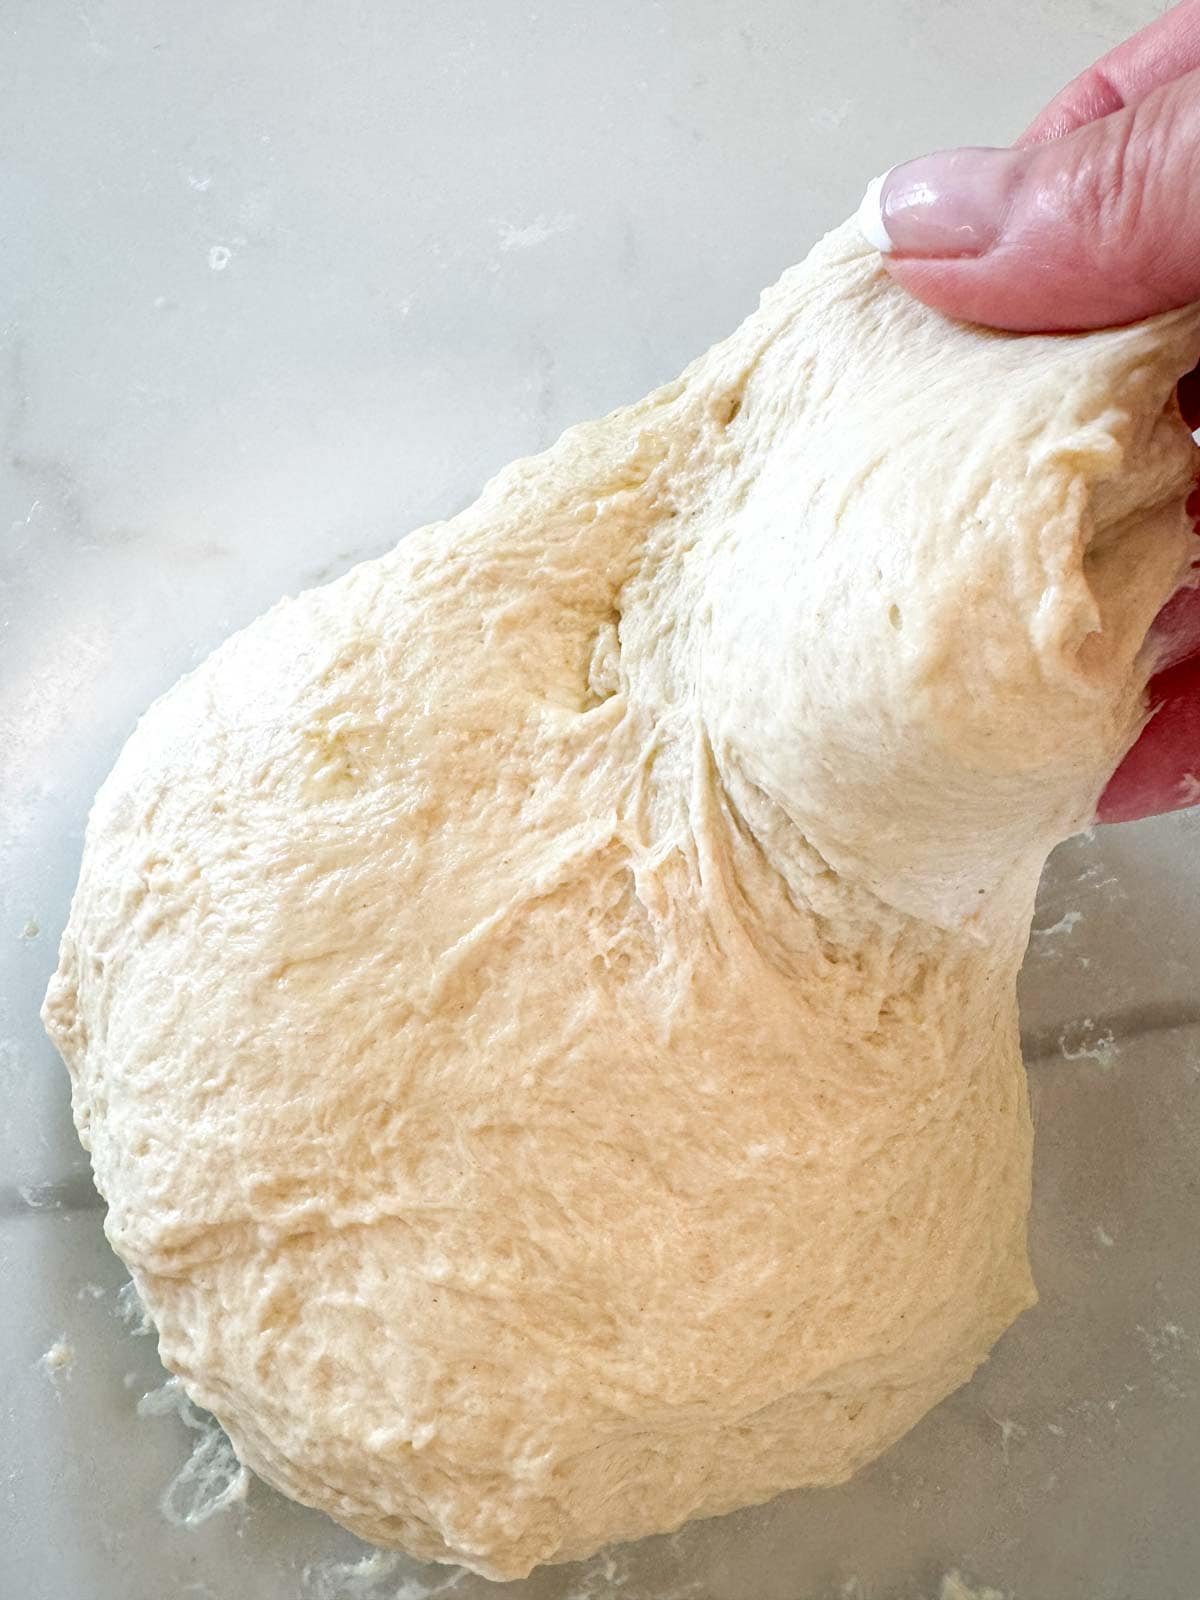
Step 3. Stretch & Fold (No Kneading Required).
Cover the bowl and let it rest for 15 minutes. Then, with oiled fingers, gently stretch one side of the dough up and fold it over toward the center. Rotate the bowl and repeat 4 times (1 set). Do 3-4 sets to build structure.
Let it rest another 15 minutes, then repeat these movements once or twice. Each time, it will get smoother and more elastic.
✨ You’ll know it’s ready when it pulls away from the sides of the bowl and feels soft & stretchy, and a little sticky when you touch it.
Let the Dough Rise
Step 4. Fermentation (First Rise, 90 Minutes).
Generously oil a quarter sheet pan or cast iron skillet with extra virgin olive oil.
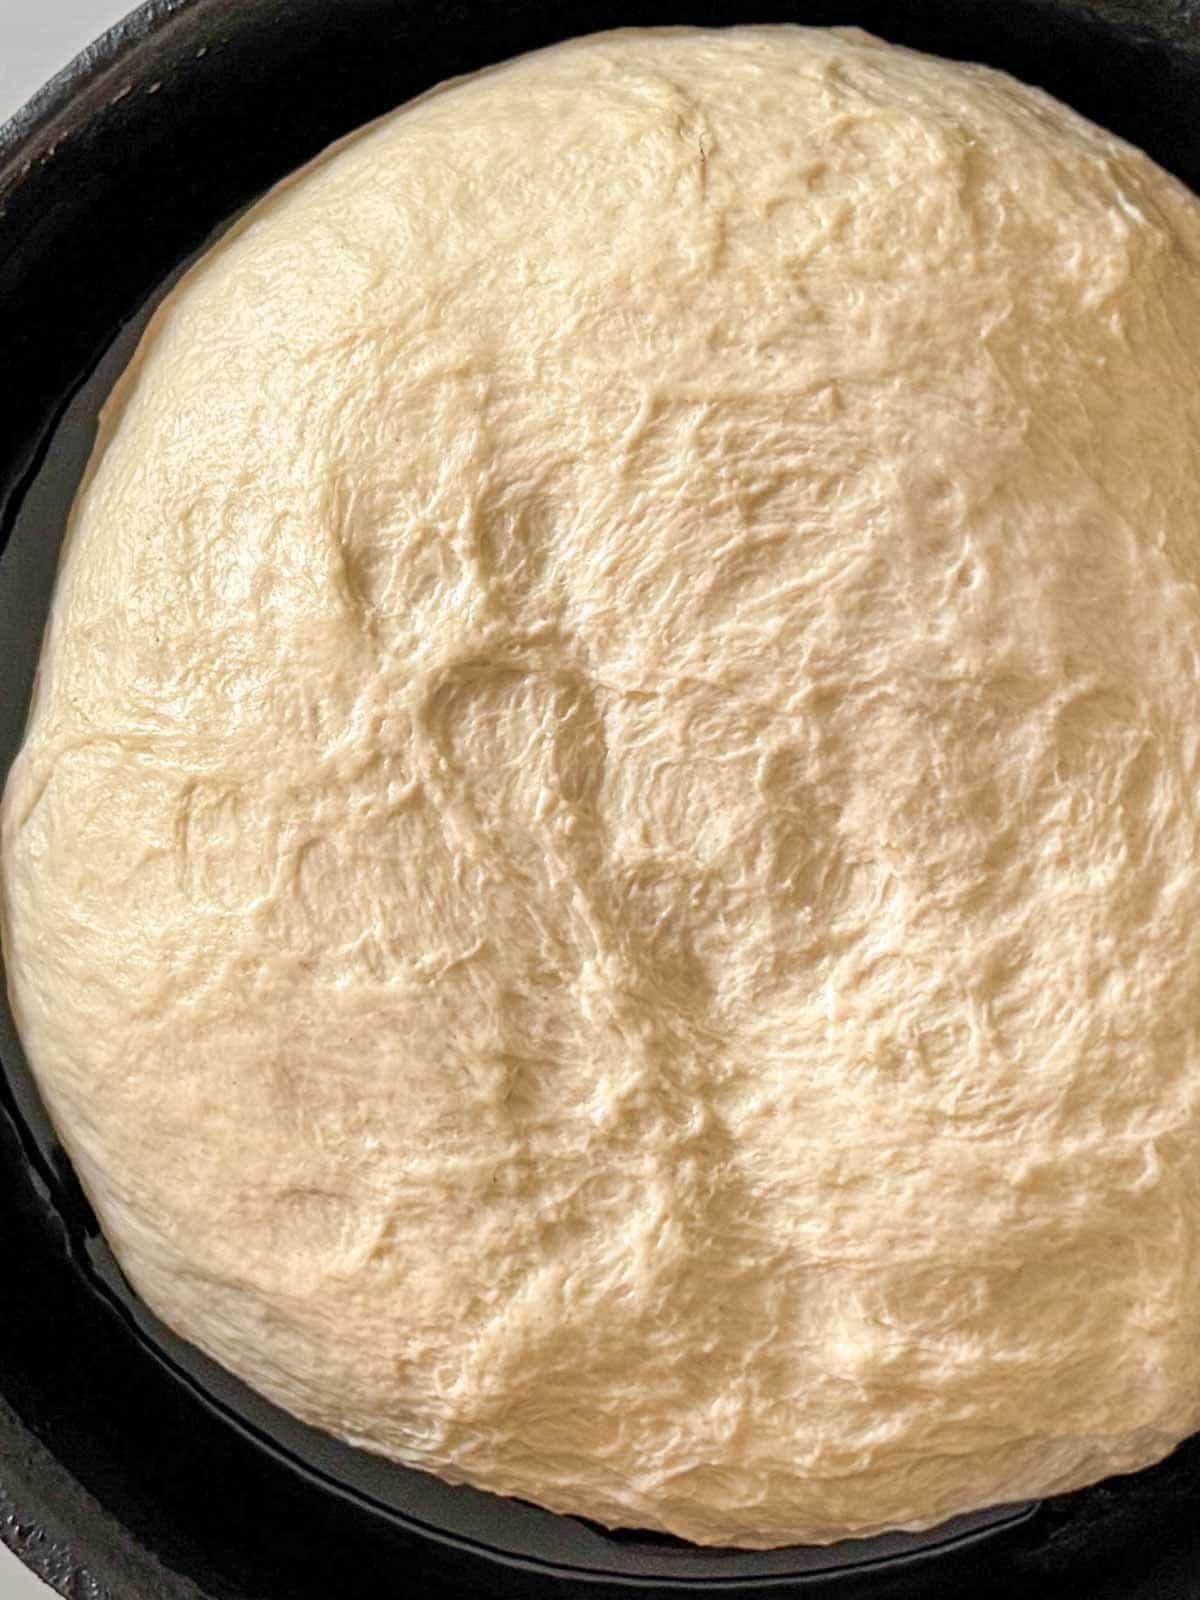
Transfer it to the pan. Cover it with an upside-down mixing bowl or plastic tub, anything that won’t touch the dough and risk deflating it, and let it rise until doubled in size (~90 minutes).
✨ This slow rise helps develop flavor and that beautiful airy texture you expect from homemade focaccia bread.
Optional Overnight Dough (Cold Ferment)
Want to make it ahead? After mixing and folding, cover the bowl and refrigerate overnight (up to 24 hours).
The next day, transfer it to a well-oiled pan and let it rest at room temperature for 1-2 hours, until it has risen. Then proceed with the recipe.
Shape the Dough and Let it Rise Again
Step 5. Shape the Dough. (Stretch)
Once the dough has doubled in size, gently stretch it to cover the pan.
Step 6. Proof the Dough. (Second Rise, 45 Minutes)
Cover the pan and let it rise again for 45 minutes.
✨ While you wait: If using a baking stone, place it in the lower third of your oven.
Make the brine: In a small container, combine olive oil, a splash of water, and a pinch of salt. Shake or stir to mix.
✨ I first learned to use a brine when making homemade focaccia bread from Marcella Hazan’s Essentials of Classic Italian Cooking, and was completely inspired by Samin Nosrat’s Salt, Fat, Acid, Heat.
Preheat Oven to 450°F
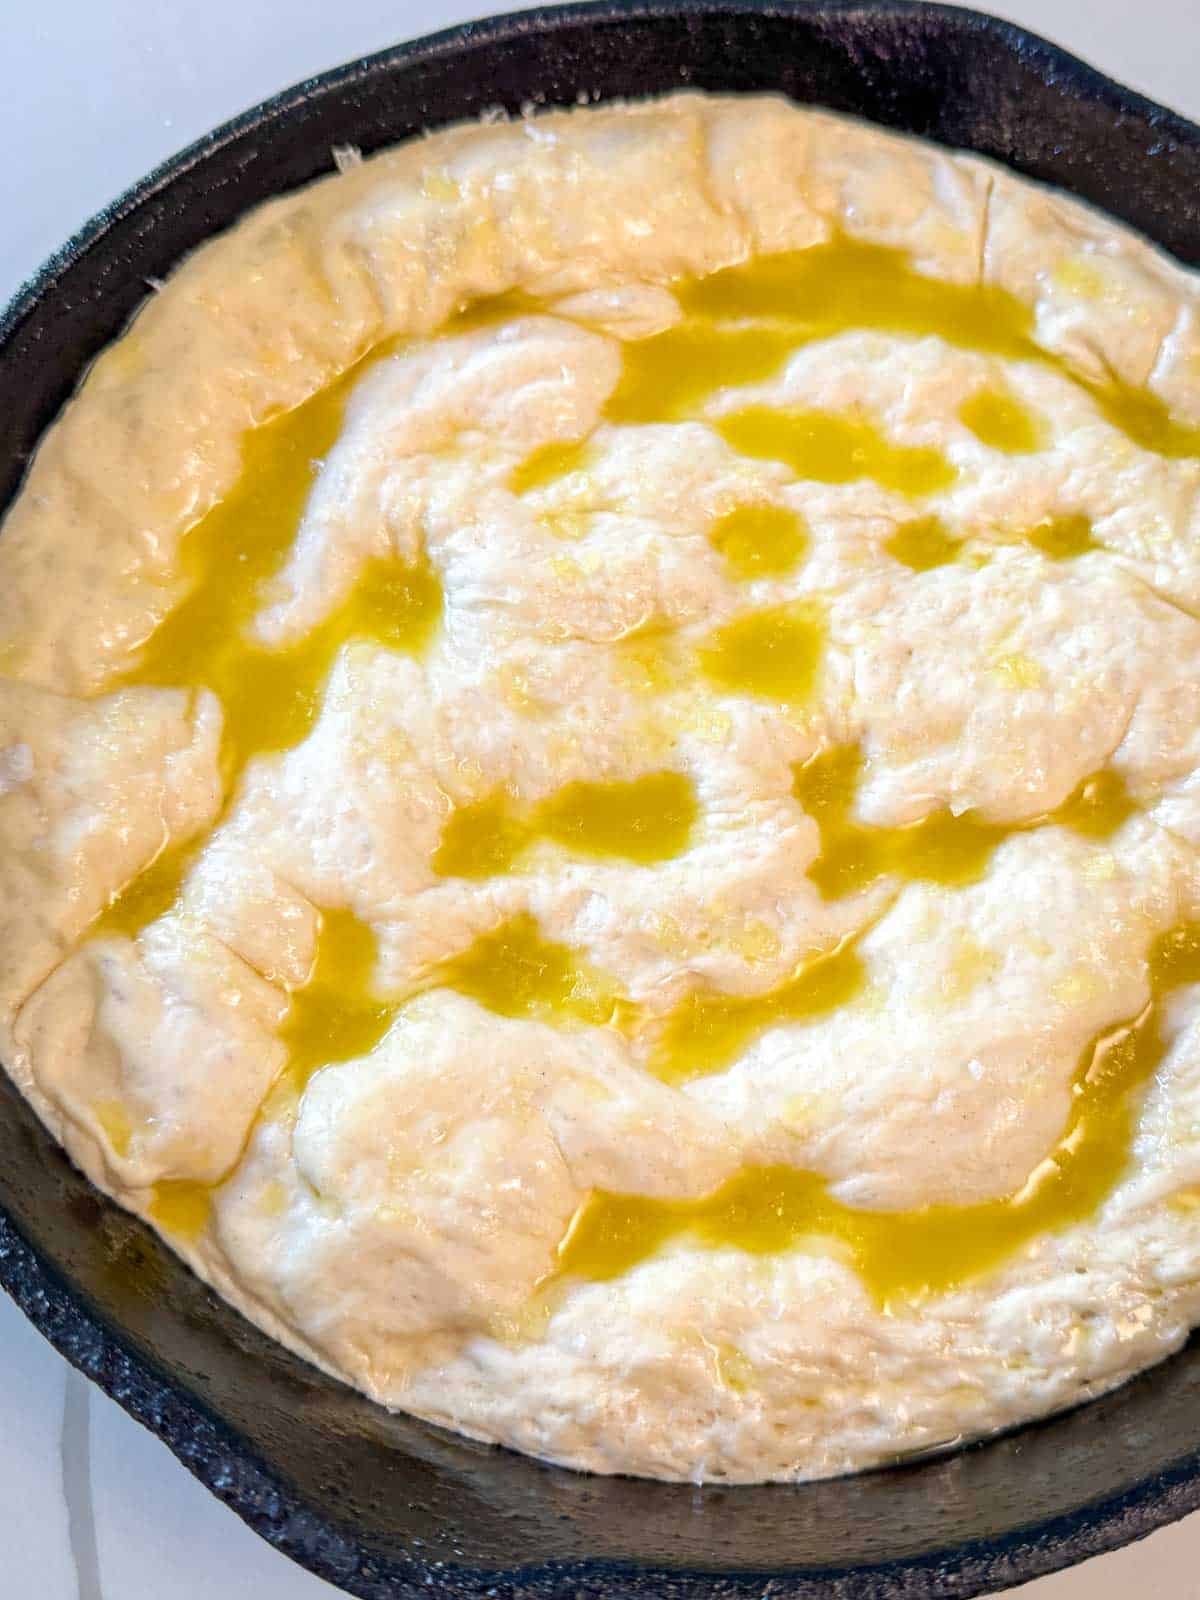
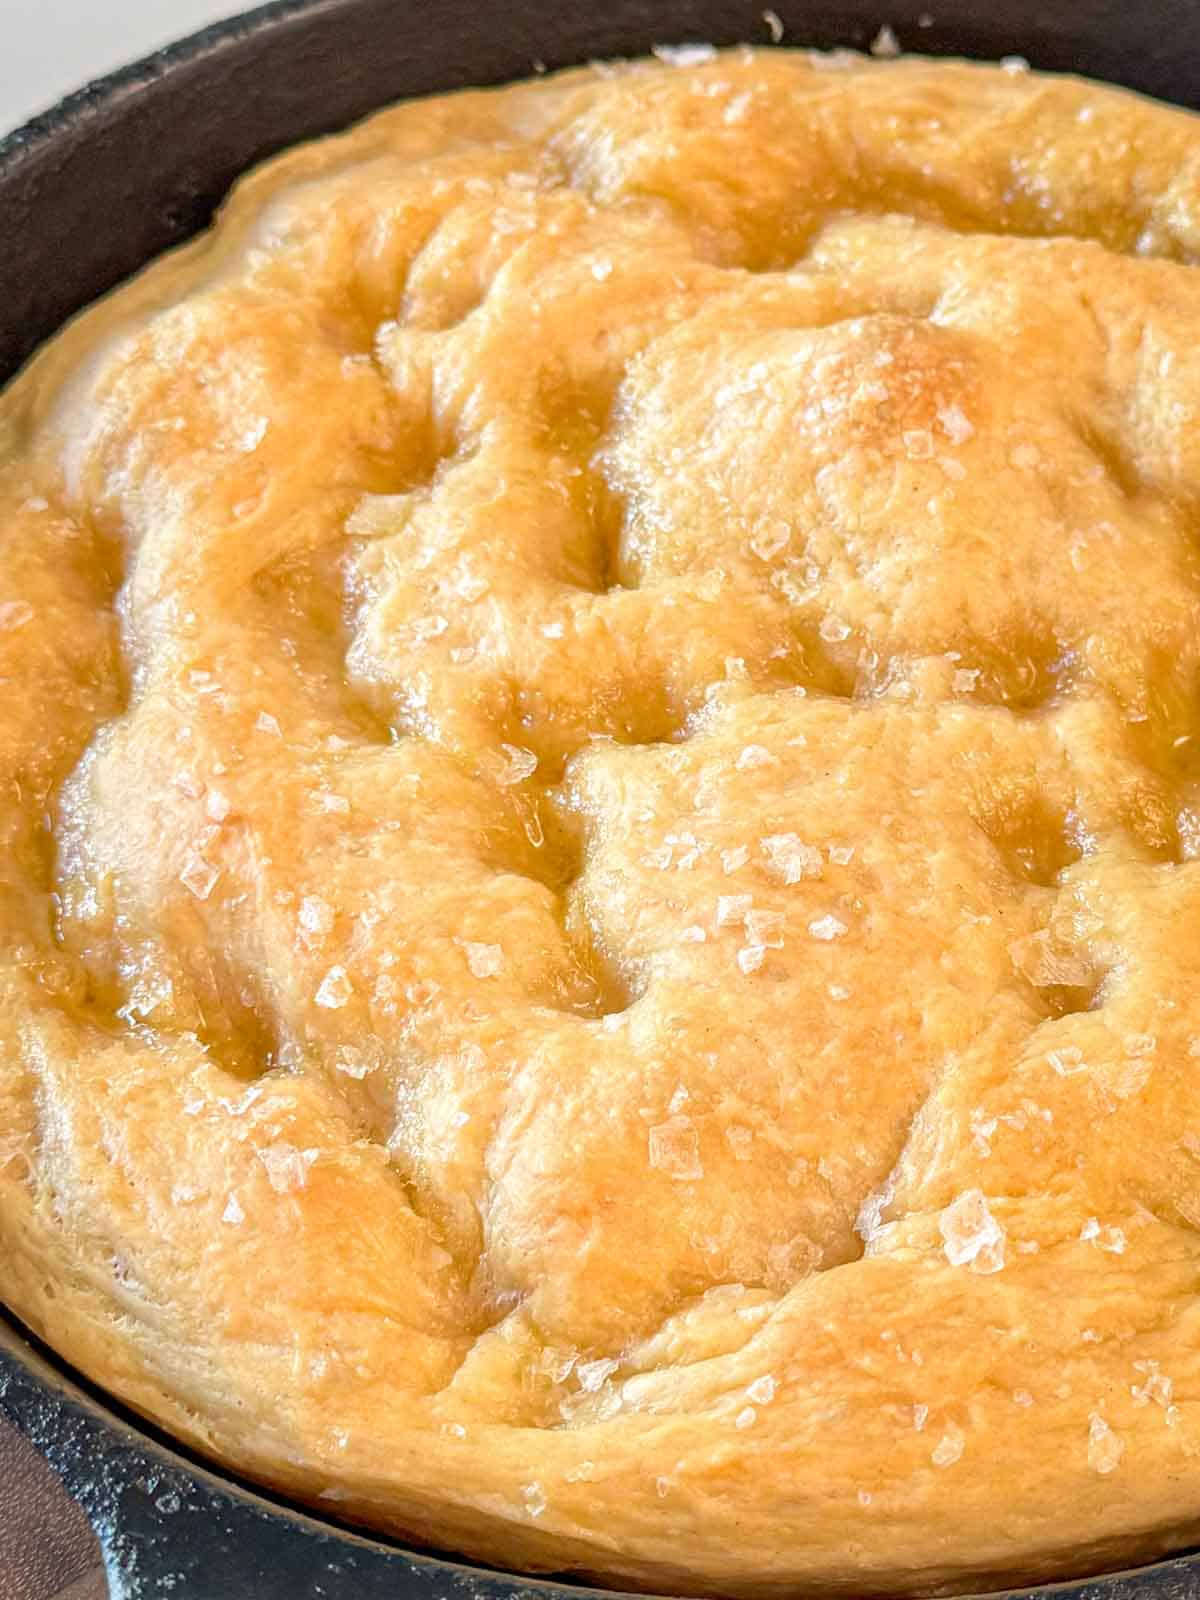
Step 7. Dimple and Add Toppings. (Dimple, Pour, Sprinkle)
With oiled fingertips, gently press into the dough to make those signature little wells (dimples).
Pour on Brine + Add Toppings: Gently pour the brine over the dough, letting it pool in the dimples. Sprinkle kosher salt (or flaky sea salt) evenly over the top. Add any additional toppings now.
Step 8. Bake for 20 minutes. If it looks like it’s browning unevenly, rotate the pan and bake for 5 more minutes, until it’s lightly golden brown.
Step 9. Final Steps. Remove the focaccia from the oven and set it on a cooling rack.
Step 10. Serve. Focaccia is best served warm on the day it’s made.
✨Entertaining tip: Plan to pull the homemade focaccia out of the oven right before serving so it’s warm and fresh. Your kitchen will smell amazing, and guests won’t be able to resist!
Expert Tips
- Weigh the Flour - For best results, use a kitchen scale to weigh the flour instead of using measuring cups. If you do use measuring cups, measure the flour using the scoop and level method.
- Use High Hydration for Airy Crumb. The key to that signature bubbly focaccia texture is hydration. This recipe uses 80% hydration, which creates a light, airy interior. It’s what gives focaccia its soft crumb and crisp, golden crust.
- Go for a Long, Slow Rise. For even better flavor and texture, let it rise slowly in the fridge overnight. That cold ferment gives it bigger air bubbles and a deeper, more developed flavor.
- Handle it Gently. Be gentle when shaping and dimpling. Those air bubbles make the focaccia light and airy, and you don’t want to press them out and deflate the focaccia.
- Bake at High Heat. Focaccia bakes best at a high temperature. We recommend 450°F, which helps the dough puff up quickly and develop a crispy, golden crust.
- Check your yeast! Whether you’re using instant or active dry, make sure it’s fresh. Old yeast won’t rise like it should, and flat focaccia is so disappointing!
- For Extra Crispiness. Want an even crispier crust? Bake your focaccia in a cast iron pan or on a preheated baking stone. The extra heat from the bottom adds a great crunch.

How To Serve
Serve warm with mains, soups, or salads, or slice for sandwiches - like a piled high pastrami and provolone sandwich (our favorite!) Or serve with these tasty ideas:
Recipe FAQs
I’ve thought the same thing - more than once! But here’s the truth: high-hydration dough is supposed to be sticky. That’s what gives focaccia its light, airy & bubbly texture. It’s super tempting to add extra flour, especially if you’re new to bread baking, but doing that can make your focaccia come out dense and dry. Trust the process. Sticky is good.
That’s normal. Dough rises slowly when it’s cold. Just let it sit out at room temperature for 1 to 2 hours until it’s puffed and ready to go.
I know how frustrating that is. If your focaccia turned out flat, it usually means the dough was handled too much, didn’t rise long enough, or the yeast wasn’t fresh. Be gentle when you dimple the dough - don’t press all the air out. And always check your yeast to make sure it’s fresh.
No. Don’t fold the dough after a cold ferment. Folding before refrigeration helps build structure, but afterward, your goal is to keep those air bubbles intact. Just stretch it into the pan gently so you don’t lose that light, airy texture.
A hydration level of 80% to 85% is ideal for making focaccia with a light, airy crumb with bubbles. This high hydration dough creates the classic focaccia texture, pillowy soft on the inside with a golden, crispy crust.
For a room temperature rise, let the dough rest for about 90 minutes, or until it’s doubled in size.
To cold ferment, cover the dough and let it rest in the fridge for 8 to 24 hours. The longer, slower rise helps develop deeper flavor and creates those big, airy bubbles.
Either method works. Cold fermentation is great if you want to make it ahead of time, and if you want to make it extra flavorful.
How to Store & Reheat
Let the focaccia cool all the way, then store it in a sealed container or resealable freezer bag at room temperature. It’ll stay fresh for up to 2 days.
Why the salt looks funny next day - Flaky salt tends to melt a bit overnight as the bread releases moisture. This can make the top look a little mottled or weird - not quite as pretty as day one, but still every bit as delicious.
To reheat - For best texture, warm slices in a 350°F oven for 5 minutes. Or if you’re in a rush (we do this all the time), microwave it for about 10 seconds to soften it up.
Freezer tip - You can also freeze focaccia. Just wrap the slices individually and store them in a resealable freezer bag.


Did you love this recipe? If you make this recipe and love it, stop back, give it a 5-star rating ⭐⭐⭐⭐⭐ and leave a comment. THANK YOU!! Follow Seanna's Kitchen and share this recipe with your friends on Facebook, Instagram, and Pinterest, and subscribe to my Newsletter for ALL the latest recipes! We'd love to hear from you!
📖 Recipe

Homemade Focaccia Bread Recipe
Equipment
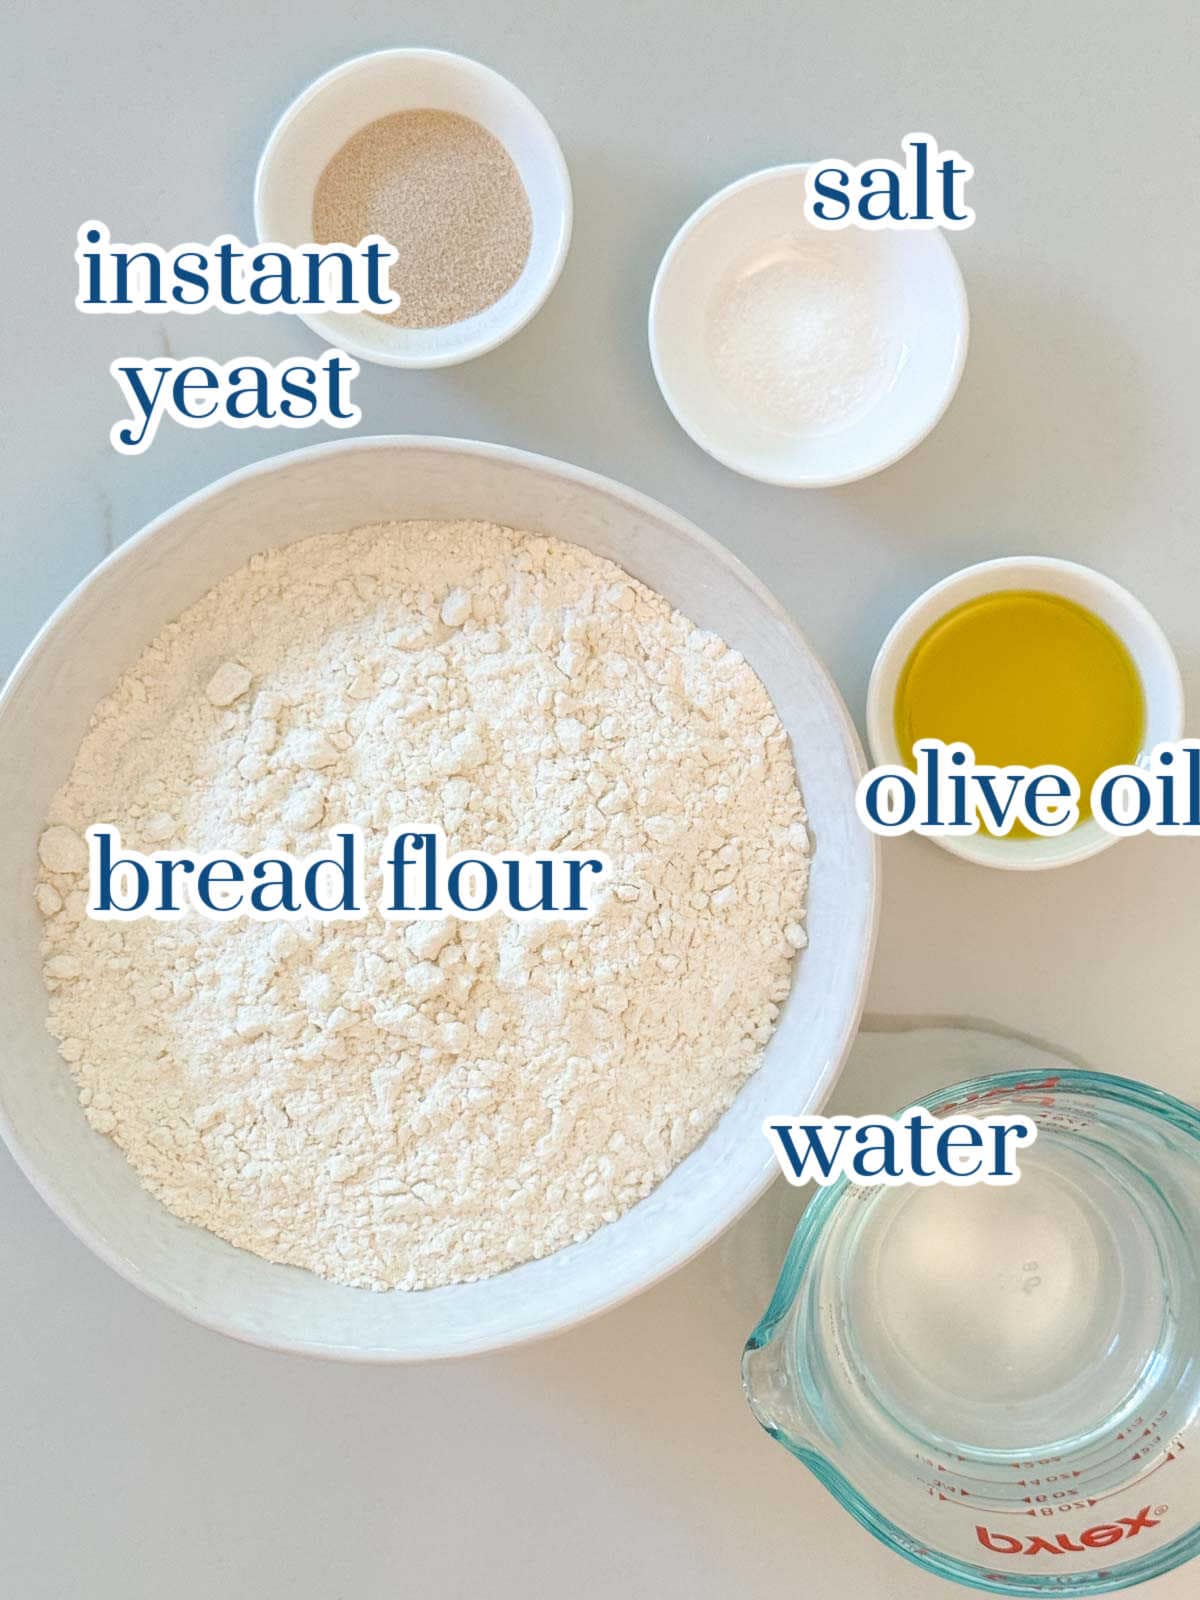
Ingredients
Focaccia Dough Ingredients
- 1 cup warm water (95-105°F)
- 1 package (2 ¼ teaspoon instant yeast
- 1 tablespoon extra virgin olive oil (plus extra for pan and work the dough)
- 2 ¼ cups bread flour (300 g)
- 1 ½ teaspoon salt (5.25 g)
Salt Water Brine
- 2 tablespoons extra virgin olive oil
- 1 tablespoon water
- ⅛ teaspoon kosher salt (a pinch)
Topping
- 1 teaspoon flaky sea salt (reserved to sprinkle on top)
Instructions
Make the Dough
- Proof the Yeast (If Needed).Using active dry yeast? In a large bowl or stand mixer, combine the warm water (95–105°F), yeast, and sugar. After 5 to 10 minutes, the top should look foamy. That means the yeast is active and ready to go.Using instant or quick-rise yeast? Skip this step - you’ll add it straight to the flour in the next one.
- Mix the Dough (By Hand).If using instant yeast: In a large bowl, whisk together the flour, salt, and instant yeast.If using active dry yeast: Stir the proofed yeast mixture into the remaining water, then pour it into the bowl with the flour and salt.Mix everything together until a sticky dough forms. It won’t look smooth, and that’s ok. Just make sure all the flour is fully incorporated and there are no dry spots.✨ The focaccia bread dough should be soft and a little tacky. If it feels dry or stiff, work in 1 to 2 tablespoons of water to loosen it up.
- Stretch & Fold (No Kneading Required).Cover the bowl and let it rest for 15 minutes. Then, with oiled fingers, gently stretch one side of the dough up and fold it over toward the center. Rotate the bowl and repeat. Do this 3-4 times to build structure.Let it rest another 15 minutes, then repeat these movements once or twice. Each time, the dough will get smoother and more elastic.✨ You’ll know it’s ready when the dough pulls away from the sides of the bowl and feels soft & stretchy, and a little sticky when you touch it.
- Fermentation (First Rise, 90 Minutes).Generously oil a half sheet pan or cast iron skillet with extra virgin olive oil. Transfer the dough to the pan. Cover it with an upside-down mixing bowl or plastic tub, anything that won’t touch the dough and risk deflating it, and let it rise until doubled in size (~90 minutes).✨ This slow rise helps develop flavor and that beautiful airy texture.Optional Overnight Dough (Cold Ferment)Want to make it ahead? After mixing and folding, cover the bowl and refrigerate the dough overnight (up to 24 hours).The next day, transfer it to a well-oiled pan and let it rest at room temperature for 1-2 hours, until it is room temperature. Then proceed with the recipe.
Shape the Dough and Let it Rise Again
- Shape the Dough. (Stretch & Fold)Once the dough has doubled in size, gently stretch the dough to cover the pan.
- Proof the Dough. (Second Rise, 45 Minutes)Cover the pan and let it rise again for 45 minutes.✨ While you wait: If using a baking stone, place it in the lower third of your oven. Make the brine: In a small container, combine olive oil, a splash of water, and a pinch of salt. Shake or stir to mix.
- Dimple and Add Toppings. (Dimple, Pour, Sprinkle)With oiled fingertips, gently press into the dough to make those signature little wells (dimples).Pour on Brine + Add Toppings: Gently pour the brine over the dough, letting it pool in the dimples. Sprinkle kosher salt (or flaky sea salt) evenly over the top. Add any additional toppings now.
Preheat the oven to 450°F.
- Bake. Bake for 15 minutes. If it looks like it’s browning unevenly, rotate the pan and bake for 5 more minutes, until it’s lightly golden brown.
- Final Steps. Final Steps. Remove the focaccia from the oven and set it on a cooling rack.
- Serve. Homemade focaccia bread is best served warm on the day it’s made.
Notes
- Use High Hydration for Airy Crumb. The key to that signature bubbly focaccia texture is hydration. This recipe uses 80% hydration, which creates a light, airy interior. It’s what gives focaccia its soft crumb and crisp, golden crust.
- Go for a Long, Slow Rise. For even better flavor and texture, let the dough rise slowly in the fridge overnight. That cold ferment gives it bigger air bubbles and a deeper, more developed flavor.
- Handle the Dough Gently. Be gentle when shaping and dimpling. Those air bubbles make the focaccia light and airy, and you don’t want to press them out and deflate the focaccia.
- Bake at High Heat. Focaccia bakes best at a high temperature. We recommend 450°F, which helps the dough puff up quickly and develop a crispy, golden crust.
- Check your yeast! Whether you’re using instant or active dry, make sure it’s fresh. Old yeast won’t rise like it should, and flat focaccia is so disappointing!
- For Extra Crispiness. Want an even crispier crust? Bake your focaccia in a cast iron pan or on a preheated baking stone. The extra heat from the bottom adds a great crunch.


Laura says
I love focaccia bread. This recipe is so simple to make. Thanks for sharing!
Seanna says
Thank you Laura! I really appreciate it!
Russ B says
This is awesome focaccia! Pro tip: Use with warm pastrami and provolone sandwiches!! Coming soon to Seanna's Kitchen??
Seanna says
Thank you! I'll get our Pastrami Sandwich on Focaccia recipe out there soon.